Comet 4 Cockpit
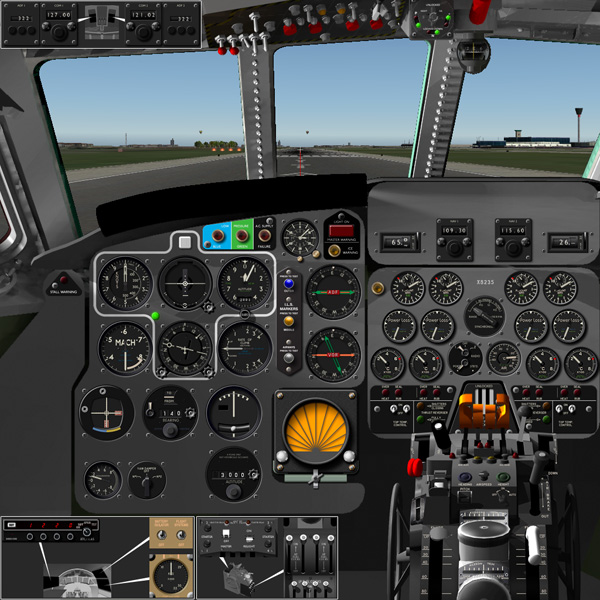
Cockpit
I’m delighted to report that the cockpit and gauges are ready for testing.
When v9 beta appeared, I weighed the pros and cons of stopping work on v8, or pressing on and finishing what I’d started. If I stopped, it would delay the whole project. If I finished the v8 model, I would need time to upgrade it to v9 afterwards. I decided to stick to my guns.
The worst thing about that decision was sticking to the ration of 1024x1024 pixels for the panel, instead of the glorious sunlit uplands of v9 which has four times the area. Four times! I could have done with that!
Fitting everything in was very difficult without either making the dials so small I couldn’t read them, or losing the visual references that give it essential “Comet-ness”. After lots of experimentation, I scaled down the pedestal, so the lowest of the prominant circular trim wheels was just visible, and squashed the height of the windsheild to include the big fire control panels. I also played about with the proportions of the main panel and engine panel so important gauges would be large enough to read.
Remote Controls
The Comet was a fully crewed aircraft, with a pilot, co-pilot, flight engineer and navigator sharing the cockpit, and busy at it. That meant many vital controls and instruments were on the engineer’s or the navigator’s station, and not in front of the pilots. I couldn’t ignore them. Fortunately, the virtual X-Plane pilot doesn’t need legs, so the footwell is the best place to shove all kinds of stuff that actually belongs somewhere else. My first attempt was to integrate the controls by extending the pilots panel down, and it looked wrong. Eventually I decided on little inset panels with locators to show where these controls actually come from.
The upper inset is straight forward. The ADF and COM radios were usually in the overhead panel, indicated by arrows. The exact installation and choice of equipment varied varied from airline to airline, but I’ve followed the layout in the works manuals. These show ADF1 and COM1 over the pilot, and ADF2 and COM 2 over the co-pilot. In fact they were all in easy arm’s reach for both pilots.
The VOR1 and VOR2 radios were usually here, too, but Comet C/N 6424 at the Museum of Flight in Seattle has DME radios in the blank panel above the engine panel. That’s perfect for X-Plane. I substituted DMEs for NAV 1 and NAV2, because they feed both VOR and DME instruments, it saves space, and it looks right.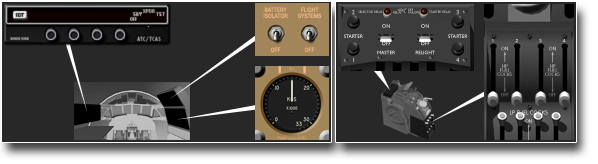
The lower inset is more complicated. I may refine this again. I would love to have had gauges for all nine fuel tanks, the electrical system, hydraulic system and HVAC, but there simply isn’t room. In this interpretation, a single fuel gauge is the sum of all tanks, there is a single battery switch, and a single switch for the flight system (the term “avionics” wasn’t in general use until the 1970s).
The engine start panel and fuel cocks were on the pedestal. The high pressure cocks operate as fuel on/off switches, which works well for the simulation. The starter panel is the right shape, but has the wrong allocation of tasks to buttons. It should have a rotary switch to select the engine, and a huge, single push button to start, but I can’t see a way to do that yet - at least not in v8.
Refinement
The background, basic shapes, windsheild pillars and cut-outs are a 2D render from a 3D file. There is no functioning 3D cockpit yet, and won’t be for some time (see BOAC Comet 4, below). However, I need to add a few bits of equipment to the 3D file, some more realistic colours and textures, better lighting, and render it again, also the side and rear views.
Testing
Testing will be mostly for overall performance, and also to make sure I’ve not forgotten some vital control or gauge. I’m sure there’ll be different opinions on this. For example, some people might criticise the lack of pressurisation controls, but I am going to leave that until v9.
Version 9
All the artwork has been created in extremely high resolution, so I have the freedom either to increase the scale of the instruments, or to enlarge the scope of the panel to other areas, for example to the overhead panels. I’ve already started experimenting with custom instruments as a way to model the original Smiths and Marconi instruments more accurately.
Next Steps
Cockpit
- To customise the transponder control unit.
- To refine the 3D render underpinning the 2D panel.
- Any additions necessary as a result of testing.
- Upgrade (expansion) to X-Plane 9xx.
Performance
- To tune the fuel consumption and drag to match real flight performance data
Sound
- To fine-tune the timing of custom sounds, with thanks to Chris Wraight.
- Liveries.
BOAC Comet 4
The Comet 4 had a shorter fuselage, different windshield line, differently-shaped overhead panels, larger radios and larger engine gauges, taking up the whole central space on the panel. To make it look right, I want to use the larger panel available in X-Plane v9. Before start planning a fully functional 3D cockpit, my priority is to finish the Comet 4C for v8.64, and then work on a BOAC Comet 4 for v9xx.
--
GMM-P (21/07/2008)